Pages

Showing posts with label home. Show all posts

Friday, April 30, 2010

Who stole my little boy? And who is this man in my house?

Everyone says “Kids… oh my god, they grow so fast!”

It wasn’t until around Christmas that I realized how much of an understatement that is. They don’t just grow fast – they grow incredibly fast.

Since last summer, my 14 year-old son (soon to be 15) has changed from a whiny little kid, who could bring tears to his eyes simply by telling him he was losing computer privileges, to a deep voiced (and getting deeper), hairy-legged, long-haired monster with a Sidney Crosby moustache (circa 2009) who could probably come pretty close to taking me down in a wrestling match.

Where the hell did my little boy go?

Where did the time go?

I am still shocked every day that I see him, or when he opens his mouth.

I can’t help but feel that I have I have somehow missed a year or two of his life during this transition. Seriously. I got ripped off.

Let this be a warning to parents who have children around the same age. If they still look like kids to you, enjoy every moment you can… because one day you’re going to blink and miss it.

Sunday, April 18, 2010

Week 36 – New floor


New floor
Originally uploaded by Twister65
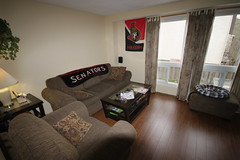
This isn't a particularly interesting Project 52 photo unless you are me. But it marks an event in my year, so I find it worth posting.

We spent yet another weekend spent with renovations. Despite the rainy weather on Saturday, we managed to get started on installing the laminate floor. It drizzled on and off for most of the day, so we were able to get outside to cut the floor, but had to keep bringing the saw back in so it didn't get wet, and got about 1/3 done. We continued on Sunday morning and pretty much finished it 9 hours later. There's a small area in front of the stairs that still needs to be done, but we want to get the nosing sanded and stained first. We still also have two landings to do, and the small upstairs hall. We're not putting a plywood subfloor down for any of them, so they'll go pretty quick (I think... and hope)

Sunday, April 4, 2010

Did I mention I hate painting?

I think all of the painting, minus the baseboards and trim, is now down. Thank God.

Today we tackled the entrance and the kitchen. It always seems to take longer than expected and we finished at around 10:30pm this evening.

We did take a little time during the day to sit outside in the sun and have a beer while we waited for the first coat of each room to dry.

The leak in the bathroom returned. I noticed the brass nut under the sink was a little wet this morning. Not enough to drip down the pipe or anything. I tightened it some more. A little later in the day I checked it and it was wet again. I tightened it a couple more times throughout the afternoon. After a few more uses it has remained dry. I hope it stays that way.

We are now at the point where we have to decide when to tackle the living room and dining area floor. The laminate has been waiting in the basement since day 1, way back in January. Before that, I told my wife we have to get those areas back to being functional and tidy. It’s going to be difficult enough having to move furniture around as we go. We don’t need all of the other crap that we have in there right now. It’s insane.

I mentioned to my wife today that it’s a good thing we’re tearing up the carpet in the living room and dining area. The wear and tear it has experienced just from working on the bathroom, kitchen and entrance is unreal.

I’m wiped. Need sleep.

Saturday, April 3, 2010

Bathroom done… almost

Stuff I learned today during our ongoing reno:

  • They actually sell the under-the-sink pipe elbow fittings all together for one price. Saves searching for the individual pieces. I like.
  • I can’t cut very squarely with our hacksaw.
  • ABS pipe doesn’t cut well with a jigsaw. Too much heat is generated by the blade, causing the pipe to melt back together as it cuts.
  • ABS glue really smells.
  • There hundreds of people in Ottawa with new BBQs from Lowes. Man, were they busy today.
  • Our bathroom walls aren’t as square as I would like.
  • Minor leaks are stubborn.

So, the bathroom is pretty much done. The vanity is screwed to the wall. The counter top is glued on with silicone. The pipes are all done and glued and don’t leak. The new faucets work. The new toilet seat is on. The new toilet roll holder is installed. New door knob is installed (Sandra wanted silver to replace the gold ones) All that’s missing is the baseboards, like everywhere else in the house where we’ve done stuff.

Sandra sanded and painted the entrance and bathroom door this morning. Unfortunately, the sanding wasn’t quite done well enough to hide most of the patches she did to the wall.  We didn’t bother doing a second coat. We’ll let it dry properly and take the hand sander to them tomorrow to see if we can get them down more so they’re more invisible.

Back to the minor leak. The faucet’s drain attachment seems to have a small leak where it meets the underside of the sink. It has a huge rubber washer that should prevent that, but it seems to leak no matter how tight I make it, and I’m paranoid of over tightening it and damaging the sink.

I removed it all and reassembled it again, and it seemed to stop at first, but then the plastic pipe with the drain plug lifter sprouted its own minor leak. I’m not sure even plumber’s tape will seal them, just because of the way they’re designed. It’s difficult to explain. I have a plan on how to stop the lifter pipe leak, but the other one still has me stumped.. unless I tried to tighten it even more.

A guy’s washroom

We grouted the entrance and bathroom on Thursday night and Sandra applied a few coats of grout sealer on Friday.

As well on Friday, we installed the vanity and dry fit the counter top – it looks pretty good. I decided to cut off the pipe elbows from the drain to make it easier to maneuver the vanity over the water supply pipes at the same time as fitting it over the drain pipe on the wall on the left. Because if that, we’ll have to pick up new pipe tomorrow to hook up the drain.

IMG_2663 The toilet has now been reinstalled. Talk about paranoia. The first few flushes had us crossing our fingers. No leaks. At first I thought that maybe we’d only need the ½” flange extension but in the end I decided to also add the ¼” one as well to bring it to floor height. We also decided to throw out the toilet seat and get a new one. Until then, the toilet is for guys only. :)

So, tomorrow (err.. today, rather) I screw the vanity to the wall, permanently attach the “cultured granite” counter top to the vanity, and install the new faucet. Sandra is going to paint the bathroom door and I think get started on painting the kitchen and the entrance. That will pretty much finish what we have to do in the kitchen, entrance and bathroom, except for the baseboards which will come once the living room laminate floor is done.

That is next. Maybe even next weekend. We’ll see.

Sunday, March 28, 2010

Home Reno – no more tiling

The tiling is DONE. Sorta. All that’s left to do is the grouting and sealing. It was so awkward trying to fit my fat ass into such a small room and install tiles, all the while trying to maintain the alignment and spacing. My knees and my back hate me.

Anyway, done. Grouting I can deal with tomorrow or the day after.

Next week we will attempt to install the new vanity, sink and faucets.

Saturday, March 27, 2010

I’m cuttin’ pipe… all night long…

Yeh, bad attempted at pipe pun. Sue me.

I took Friday off work again, this time to tackle the bathroom part of the reno. All we had done up to now was remove the old laminate and the toilet. Today it was to be gutted: vanity and sink removed, which involves cutting the copper pipes, and hacking the vanity all to hell.

It went surprisingly well, although we did run into a hurdle when I went to cut the pipes.

The pipe cutter that we bought wasn’t small enough to full rotate around the pipe to cut it because the pipes were too close to the back of the vanity. It looked like that red one in the picture, except ours was blue. My wife went to Canadian Tire to buy a smaller one, while I searched for our pipe wrench.

Cutting the pipes was a piece of cake, after shutting off the water main of course. :) We then began dismantling the vanity. It turned out that the left side of the vanity, attached to the wall, was actually the wall itself. Cheap. It took us about 10 minutes to remove all the pieces, leaving us with a floor lower than the rest of the floor. It’s a good thing we kept laminate floor scraps from last week. Laying then two-deep was enough to bring it up to the floor height.

IMG_2559 The funniest thing of the day had to be when I removed the toilet toll holder. It was old and inset into the wall and my wife wanted it gone.  I scored the edges and pried it off, leaving this massive chunk of plaster and carpet(?!) inside the wall. It took a lot of hammering to break it free. I'm not sure why they jammed carpet in behind it and also to the right of it. And, they stuffed plastic underneath it -- as insulation or to stop it from seeping down into the wall as it dried? Very odd.

With the vanity now gone, I attached the pressure-fit shutoff valves to the cut pipes. That went great. No leaks after turning the water back on. The main water shut off tap does seem to now have a very slow leak though.

My wife took some careful measurements of the floor space, taking into account the pipes and the toilet drain hole, and we managed to cover the entire floor with two large pieces of plywood. A couple of dozen floor screws later, and it was installed.

We dry fit some floor tiles and discovered the bathroom door isn’t going to close with tiles on the floor, so we’ll have to remove it and plane the bottom down. We were also quite happy to see that the layout of the tiles could not be better. The toilet drain occupies the space of a single tile, which will make the cutting really easy. As well, the sink water pipes also fit in part of a single tile space. Another easy cut. We planned this layout perfectly. :)

We also, finally, got to move our stove and fridge back into the kitchen. I didn’t mention that we grouted the tiles earlier in the week. It seems we had the presence of mind to buy quit-set grout, that dries in 3 hours.

My wife wants to paint the bathroom tomorrow before we begin laying the tile, so that’s the first thing on our list for tomorrow. We should also be able to install the floor tile. This time, I think we’re going to try and get the cut ones installed at the same time. Once the tile is laid, we really have no choice but to wait until Sunday to grout and install the vanity, if we’re lucky.
Sunday, March 21, 2010

Home Reno – finishing the puzzle… well, mostly

We lucked out and the forecasted rain did not become a reality!

The entire day was spent cutting tile to fit near the walls… or around walls… and thresholds. We didn’t get started with cementing them down until some time after 3:00pm. We were so tired by then, that we almost decided to wait until another time. It’s hard to believe that it took that long. I never would have imagined it.

Anyway, we stuck it out and got it all done. The bathroom still has not been touched since we removed the laminate and the toilet. I’m sure that old vanity is going to take forever to remove because of the awkwardness of the plumping. So the floor in there still has to be done. It’s small, so it shouldn’t take long. (Famous last words)

After setting the last piece of tile at the entrance to the den, I was standing on it to make sure it was set and the damn thing snapped clean in half. I came so close to just leaving it. It didn’t look that bad. :) But I couldn’t. I cut a new one.

Our primary concern is still with getting the kitchen back to being functional, so we’ll be looking at grouting this week. Bathroom next weekend.

We’re both contemplating taking another Friday off as well.

Home Reno – pieces of the puzzle

The whole day was spent mixing mortar and laying tile.

We started off laying the tile without mortar to get a good idea of how they should be placed so that we didn’t end up with small pieces along any of the walls.

Thank god we bought the big mixer bit to attach to my drill. That stuff is thick and doesn’t mix easily. I thought it was going to burn out the drill, it got so hot. It said to mix for 5 minutes, let sit for 5-10 minutes, mix again and then use it. It took more than 5 minutes to fully mix so there was no powder at the bottom of the bucket.

IMG_2527Here’s a tip: make sure you have two buckets. Start to mix in the first bucket and then pour/scrape it into a second bucket so you can get all the unmixed powder at the bottom of the first bucket.

Everything I read said to lay all of the full tile pieces first, let them dry and then do the cut pieces later. It makes sense, but it can be a big pain to scrape the excess mortar from the non-tiled areas so they remain smooth for when you do put those tiles down.

Our living room looks like hell now. My wife joked that our house looks like it belongs on an episode of Hoarders. Funny, but so true.

We still haven’t done any more to the bathroom. There’s rain in the forecast for tomorrow, so I suspect it’s unlikely that we will be getting it done anytime soon. I guess we’ll continue with the tiling to get the kitchen back in order, and then we can work on removing the old bathroom vanity.

Friday, March 19, 2010

Home Reno - demolition

We got to Home Depot at around 7:15am or so. We wanted to get there early so we had a chance to rent their $20 van to deliver our own plywood, rather than pay the ~$60 for them to deliver it.

IMG_2517 We picked up fifteen 8’x4’x½” sheets of plywood, two bags of mortar, a box of 3700 flooring screws. Thanks to the cashier at Home Depot, we saved $2 on the screws and got 2700 more! We had originally picked up two boxes of 500. They had larger boxes at the cashier, and she pointed out that the 3700 box was $2 cheaper. Go figure. Good thing we went with the larger box because I went screw crazy on the plywood.

By around 3:50pm, we had moved all of the kitchen appliances into the dining area, we had all of the old laminate ripped up, all of the baseboard and ¼ round off, the toilet removed (that old wax(?) ring was f’n gross) and two sheets of plywood installed. It was slow going, mostly because we were trying to cut the plywood to fit all the angles, as opposed to using lots of smaller pieces.

We also slowed down when we were removing the laminate in the bathroom. We had originally planned on gutting the entire bathroom before starting to put down the plywood, but it turned out that the braided hose we got to replace most of the copper pipe was too short. My wife went back to Home Depot and exchanged it for longer hoses and different pressure fittings. But at the same time, we decided on NOT removing the old vanity for the time being because it’s going to be time consuming and we need to try and get our kitchen back to being functional as soon as possible. I figured we could get the kitchen and front entrance tiled and grouted first, and then do the bathroom later.

IMG_2514 We stopped at 7:20pm after installing plywood in the kitchen and the front hall. That’s not as much as I had originally hoped on getting done, but I’m still happy with it. The weather forecast was originally calling for rain tomorrow, so we tried to get as much of the cutting done today since we were doing it all outside. I just checked the forecast now, and there’s no rain forecast for tomorrow, so maybe we will be able to get the bathroom floor gutted and plywood down after all.

I have to say that the best tool I have, and used today, was my Dad’s old variable-speed Black & Decker drill. It has to be around 30 years old and still works like a charm. My own drill is not variable-speed.  With a Robertson screw driver bit in it, it was a huge time saver screwing down all the plywood. I can’t imaging the hell it would have been screwing them all down by hand. There’s no way I could have done it. His old steel yard stick also came in handy. My Dad used to do a lot of home reno projects when I was a kid, so I like to think that he was with us in spirit, via his old tools. Thanks Dad! :)

Thursday, March 18, 2010

Home Reno – Turning off the water

When I got home from work, I decided to make sure I could shut off the water to our house. I didn’t want any surprises tomorrow when we gutted the ½ bathroom. I knew where the tap was, but never had the need to turn it off. Until now.

The tap was very stiff, but I managed to turn it a dozen times until until it turned no more.

We turned on the tap in the bathroom and the water flowed freely. This was definitely not what one would expect with the main tap being turned off.

I had a look around the basement for another tap. Nothing.

This one had to be the one. It was attached to a pipe coming up through the concrete floor. The pipe was very cold. There was no doubt. I turned it back on again. And off again. We tested the basement taps near the washing machine. We still had water. WTF?

I tried turning off the tap leading to the hot water heater and then turned on the hot water tap at the sink. No water. I turned it back on. The pipe leading to the hot water tank comes from this main tap, so I was 100% sure this was the main source and all leading to this sink.

I swore a lot. My wife asked me to stop swearing. I told her I needed to swear.

I turned the main tap off again… as tight as it would go. I was afraid that it might snap off.

I walked over to the sink and turned on the cold water.

It dribbled out. Success!

I guess the stubborn tap, having not been used for such a long time, just needed loosening up… or something.

I ran up to the bathroom and tested its taps. They too stopped working.

I turned the main back on until tomorrow.

One problem overcome… with persistence and a lot of swearing. It is now beer:30.

Bring on tomorrow.

Home reno 101

I don’t consider myself to be a contender for Canada’s Worst Handyman, but I am also far from being a home renovation expert.

I always get nervous when trying new reno projects for the first time. 99% of the time, they go well, but there’s always that 1% taunting me that I’ll mess it up.

We’ve been doing a main floor reno since January. What started off as simply “replacing this old carpet” has turned into…

  • removing carpet from all stairs, sanding, staining and finishing steps (done)
  • installing ceramic tiles on the risers (done)
  • repainting the stair stringers (done)
  • removing all baseboards on the main floor, stair landings and upstairs hall (done)
  • repainting the upstairs hall, stairs case walls – upper and lower – living room and dining area (done)
  • removing carpet in the living room and dining area and replacing it with laminate flooring, including a ½" plywood subfloor
  • removing old laminate floor in entrance, kitchen and ½ bathroom and installing porcelain floor tile, also including a ½" subfloor and removal of old vanity
  • installation of new baseboard throughout all affected areas
  • possibly installing crown moulding in living room and dining area

The two parts of this project that I have never “experienced” are:

  • Gutting a bathroom and installing a new vanity and sink, including the removal and reinstall of a toilet and cutting pipe copper pipe
  • Installing porcelain floor tiles

The vanity happens to be the original vanity installed back when this townhouse was built in the 1970s. It has no shutoff valves on the plumbing underneath the sink. Thankfully the toilet appears to be newer and does have a shutoff valve installed, so that’s one less thing to do (or screw up)

I’ll be taking the easier route and won’t be welding any pipe once I cut the old ones. I have the braided hose with pressure fittings and shutoff valves. One day I’ll take on the welding task, but for now, easy is key for me.

Wish me luck.